m (added a note about the badge material failing to compile curently) |
|||
| (15 intermediate revisions by the same user not shown) | |||
| Line 24: | Line 24: | ||
==How it Works== | ==How it Works== | ||
[[File:Badge_mesh.jpg|frameless]] | [[File:Badge_mesh.jpg|frameless]] | ||
Badges, as they are implemented here, are simply a texture with a cutout mask on them. This cutout mask is applied to the above mesh, and creates the shape of the badge. As you can see in the above image, there are several duplicate layers to the mesh. This helps give depth to the badge. | Badges, as they are implemented here, are simply a texture with a cutout mask on them. This cutout mask is applied to the above mesh, and creates the shape of the badge. As you can see in the above image, there are several duplicate layers to the mesh. This helps give depth to the badge. | ||
| Line 104: | Line 105: | ||
[[File:Download_substance.jpg|frameless]] | [[File:Download_substance.jpg|frameless]] | ||
Once you've got that downloaded and installed, open the Custom_Badge.sbsar file (located in: <code>Automation_SDK\AutomationGame\Mods\ExampleBadge\Content\</code>) | Once you've got that downloaded and installed, open the Custom_Badge.sbsar file (located in: <code>Automation_SDK\AutomationGame\Mods\ExampleBadge\Content\</code>) | ||
You should be greeted with something that looks a little like this: | You should be greeted with something that looks a little like this: | ||
| Line 153: | Line 154: | ||
=== Creating your Fixture Mod Plugin === | === Creating your Fixture Mod Plugin === | ||
Using the correct version of Unreal Engine, with our modding tool project opened and plugins loaded, select 'Create Mod' from the top menu bar. | Using the correct version of Unreal Engine, with our modding tool project opened and plugins loaded, select 'Create Mod' from the top menu bar. | ||
[[File: | |||
[[File:UE4ModCreation_02.gif|alt=|frameless|360x360px]] | |||
=== Import Your Textures === | |||
Click the 'Import' button in the top of the Content Browser, and import your Badge texture and Normal Map texture to your new Mod folder. | Click the 'Import' button in the top of the Content Browser, and import your Badge texture and Normal Map texture to your new Mod folder. | ||
===Copy the Badge Mesh=== | ===Copy the Badge Mesh=== | ||
Select the ExampleBadge_MESH file from the ExampleBadge Content, and drag-and-drop it to your mod folder and select 'copy' from the dialog box that appears: | Select the ExampleBadge_MESH file from the ExampleBadge Content, and drag-and-drop it to your mod folder and select 'copy' from the dialog box that appears: | ||
[[File: | |||
[[File:Move_mesh.jpg|frameless]] | |||
===Copy the Badge Material=== | ===Copy the Badge Material=== | ||
Open the Material Instance from the ExampleBadge folder by double-clicking it: | Open the Material Instance from the ExampleBadge folder by double-clicking it: | ||
[[File: | |||
[[File:Open_material_instance.jpg|frameless]] | |||
Find the Master Material in the Content Browser by clicking the magnifying glass icon in the Material Instance: | Find the Master Material in the Content Browser by clicking the magnifying glass icon in the Material Instance: | ||
[[File: | |||
[[File:Find_master_material.gif|frameless]] | |||
The Content Browser has navigated to the Master Material: | The Content Browser has navigated to the Master Material: | ||
[[File: | |||
[[File:Find_mater_material.gif|frameless]] | |||
Drag-and-Drop the master material to your mod folder and select 'copy' in the pop-up menu: | Drag-and-Drop the master material to your mod folder and select 'copy' in the pop-up menu: | ||
[[File: | |||
[[File:Cope_master_material.jpg|frameless]] | |||
right-click that new master material in your mod folder and select 'create material instance': | right-click that new master material in your mod folder and select 'create material instance': | ||
You should now have a mod folder full of | [[File:Create_material_insance.jpg|frameless]] | ||
[[File: | |||
You should now have a mod folder full of two textures, a mesh, a material, and a material instance: | |||
[[File:Final_mod_folder.jpg|frameless]] | |||
We'll set up everything now. | We'll set up everything now. | ||
NOTE: currently, the SDK is missing a texture that is used by this master material, which causes the material to fail to compile, and your mod will not work! | |||
to fix this: open the master material that you copied to you mod folder, and put your textures directly into the texture samplers that show errors, making sure to put the normal map texture into the normal map sampler, and the regular texture into the regular texture sampler. that will fix the material breaking. in the material menu, click compile, then save, then close the material. continue as normal. | |||
===Putting the Textures in to the Material Instance=== | ===Putting the Textures in to the Material Instance=== | ||
Open the Material Instance by double-clicking on it | Open the Material Instance by double-clicking on it | ||
[[File: | |||
[[File:Opening_material_inst.gif|frameless]] | |||
By default, the material will have the example textures in it. | By default, the material will have the example textures in it. | ||
To change this, select your textures one by one and drag them in to the corresponding slots in the material instance: | To change this, select your textures one by one and drag them in to the corresponding slots in the material instance: | ||
[[File: | |||
[[File: | [[File:Setting_the_normal_map_texture.gif|frameless]] | ||
[[File: | [[File:Setting_the_diffuse_textures.gif|frameless]] | ||
Once you have assigned your textures, you can change some of the settings in the material instance: | |||
[[File:Material_instance_settings.jpg|frameless]] | |||
From the top, these settings are: | From the top, these settings are: | ||
| Line 196: | Line 224: | ||
===Putting the material instance in to the mesh=== | ===Putting the material instance in to the mesh=== | ||
Open the mesh by double-clicking on it, and drag-and-drop the material in to the material slot in the Static Mesh editor | Open the mesh by double-clicking on it, and drag-and-drop the material in to the material slot in the Static Mesh editor | ||
===Put the Mesh in to the | [[File:Setting_material_in_mesh_editor.gif|frameless]] | ||
Open the | |||
[[File: | ===Put the Mesh in to the Preview File=== | ||
Open the Preview by double-clicking on it, and drag-and-drop the mesh in to the Conforming Mesh slot on the Fixture Blueprint settings. You can read more about the Fixture Blueprint [[Fixture Mods#The Fixture Blueprint and its Components|here]]. | |||
[[File:Setting_mesh_in_blueprint.gif|frameless]] | |||
===Generate the Blueprint GUIDs=== | ===Generate the Blueprint GUIDs=== | ||
In the Fixture Blueprint, generate the Fixture and Family GUID | In the Fixture Blueprint, generate the Fixture and Family GUID | ||
[[File:Animated1.gif| | |||
[[File:Animated1.gif|frameless]] | |||
==Make sure to Compile the blueprint, then save all your files.== | ==Make sure to Compile the blueprint, then save all your files.== | ||
[[File: | [[File:Save_and_compile.gif|frameless]] | ||
==Generate the Fixture Thumbnails== | ==Generate the Fixture Thumbnails== | ||
Latest revision as of 21:51, 10 October 2024
A Badge Mod is the same basic class as a regular Fixture, but I've put together a streamlined and simpler method for creating custom badges for people who do not know or care about 3D modelling.
If you feel comfortable enough with 3D modelling, it may be easier to follow the Fixture Mods page, and create a Fixture Mod with your badge as a Conforming Mesh.
For those that simply have an image of a badge and want it on their car, read on!
Fast Rundown
- A Badge Mod is a regular Fixture
- All you need to make your custom badge is an image (everything else is provided in the tools)
- That image must have four colour channels: RGBA
- That image can have any number of colours in its RGB channels
- The shape of the badge is defined in the Alpha channel
- that image gets fed in to a provided material
- that material gets fed in to a provided mesh
- that mesh gets fed in to the Fixture Preview File
For a visual breakdown of what we'll be making for this badge, take a look at the following reference graph:
How it Works
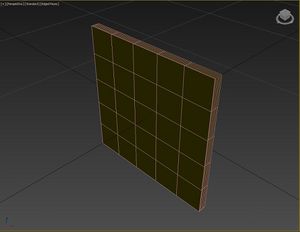
Badges, as they are implemented here, are simply a texture with a cutout mask on them. This cutout mask is applied to the above mesh, and creates the shape of the badge. As you can see in the above image, there are several duplicate layers to the mesh. This helps give depth to the badge.
Of course it is possible to create a custom mesh with the shape of the badge that you would like to have, and simply import it in as a conforming mesh in to a Fixture Mod, but for the sake of simplicity I have created this workflow for people who do not want or care for working on 3D meshes and simply want to bring their custom badge design in to Automation.
Creating your Custom Badge Texture
We'll use Photoshop for this example, but anything that supports saving out an alpha channel to a TARGA file should work fine (a quick google tells me that GIMP should work fine)
Badge Image Size
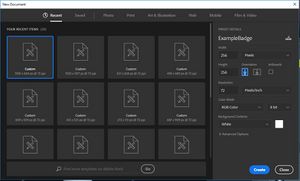
Create a new image. The image needs to be square, and it needs to be a power of two (for example, 64x64, 128x128, 256x256, etc). For all the default textures in Automation, we use a size of 256x256 pixels. I find this is detailed enough for most of the default designs without being too blurry up close, but there isn't really an upper limit to your badge size. Your design could, for instance, be 8192x8192, or 8x8, though neither of those extremes is recommended.
Create your design
You can go as wild and creative as you want, so long as the colours you chose fit on the RGB spectrum (ie: they dont extend into any 4th or high-dimensional space, which... yeah, im just having fun at this point), and so long as that design fits on the square texture. If you want a rectangular badge, just pillarbox or letterbox it.
Your image size must be a power of two. that means, 64x64, 128x128, 256x256, 512x512, 1024x1024, 2048x2048, etc.. dont go higher than 4096x4096. usually 2048x2048 is the highest you need to go, and all the default ones are 256x256.
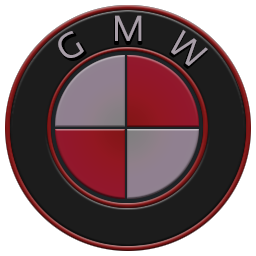
For this example, I have created a badge for the fictional company I just now made up for the purposes of this tutorial - Gasmean Motor Works:
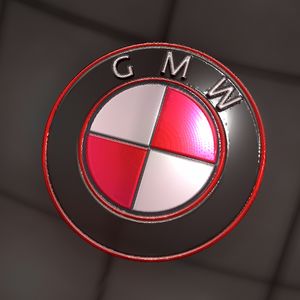
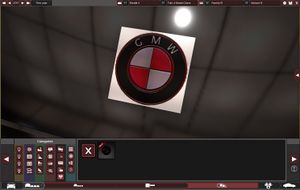
If I were to import this as it is now in to the Automation SDK, it would appear like this on the badge mesh:
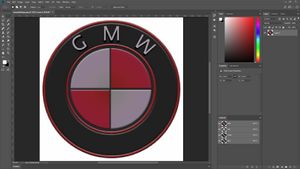
To find out why it looks just like a square texture, instead of a nice round badge, let's have a look at the file in Adobe® Photoshop® software (yep, that's apparently how you're supposed to say it. I'm just going to refer to it as 'Photoshop' from here on out, like any sane person):
Enhance:
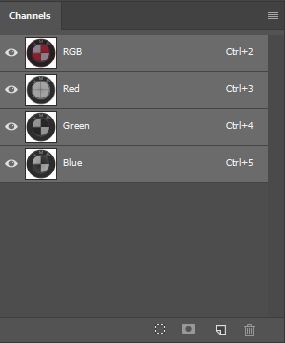
A-ha! There's the problem. There's no Alpha Channel!
Let's make one.
Creating the Alpha Channel
An Alpha channel is similar to how a Red, Green, or Blue channel works. Except that instead of defining how much red, green, or blue there is in the texture, you're defining how much of that texture is visible. This means that yes, you can have a texture that is very red but also completely invisible! In practicality, this doesn't work quite as well as you'd think, especially when we take in to consideration how we are using alpha channels in UE4 to define the cutout mask for these badges.
To get the most out of the rendering features available to us in the Unreal Engine, we'll be using the Alpha Mask Blend Mode.
What the Alpha Mask Blend Mode does is find a point between white and black at which the object is visible. Any value above this is visible, and any value below it is invisible. Think of it as a switch. On, or Off. Visible, or Invisible. White parts of the texture define what parts of the object are visible, and black parts define what parts are invisible.
There are of course other blending options, such as 'Translucent', which is a complete gradient of visibility from completely visible, through slightly visible, to mostly invisible but still sort of there, to completely invisible. Unfortunately, this blend mode suffers from not having a lot of the rendering features that we've come to know and love, and so we avoid it as much as possible for most things.
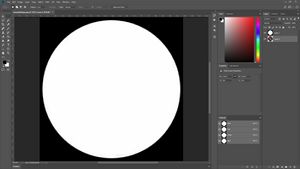
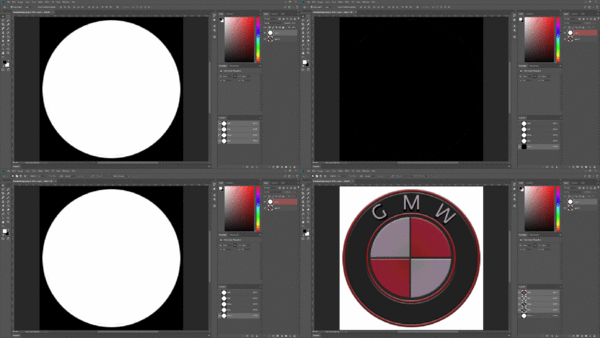
To make an Alpha Channel for the purposes of this Alpha Cutout Mask in Photoshop, I'm just going to select my design and create a new layer, with a white colour where the badge design is and black where there is no badge:
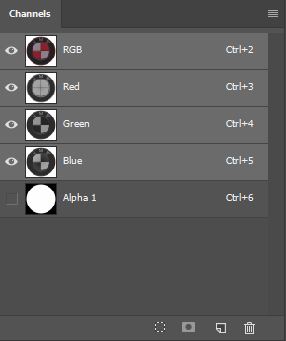
Copy-and-Paste this Alpha Mask to an Alpha Channel by selecting 'Create New Channel' in the Channels box in Photoshop:
Your channels list should now look something like this:
Saving your Design to a file
Saving out your finished design is less simple than you would expect.
So it's an image with some transparency... So what, right? You thought you could just save out a .PNG and be done with it? You're wrong, kiddo. Shit's about to get real.
Photoshop does weird things to .PNG files to save out the opacity on them. You can test this for yourself by saving out your file to a .PNG, and before you've even finished saving it you'll notice something is amiss:
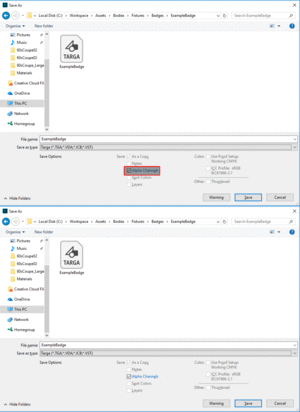
So the Portable Network Graphics format (.PNG) won't work. What does work is the Truevision TGA (TARGA) image format (.TGA), which is supported by Photoshop by default, and supports Alpha channels:
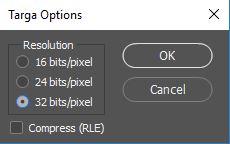
Hit 'Save'. Make sure to save the file out as a 32-bit image to ensure that the alpha channel survives:
Creating a Normal Map
I have created an easy to use normal map generator in the Automation SDK files, which you can open by installing Substance Player from the Allegorithmic website for free, here: https://substance3d.adobe.com/documentation/sp31/substance-player-2294742.html.
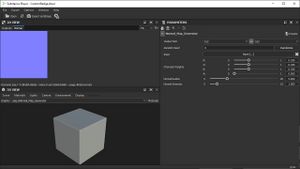
Once you've got that downloaded and installed, open the Custom_Badge.sbsar file (located in: Automation_SDK\AutomationGame\Mods\ExampleBadge\Content\)
You should be greeted with something that looks a little like this:
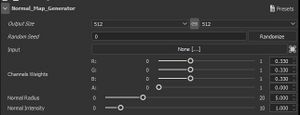
We only need to worry about the small cluster of settings in the top right of the Substance Player.
The settings we need to pay attention to are as follows:
- Output Size - This determines how high-resolution you want your normal map to be. It is usually fine to keep this at the same resolution of your colour texture, but sometimes you can get away with having it at a lower resolution.
- Input - This is where you would feed your texture in, to create a Normal Map from.
- Channel Weights - This setting lets you chose how weighted each colour channel of your texture is, for determining how the normal map is generated. For instance, if you wish to use the alpha channel only, to have a normal map only at the edges of your badge, set the R, G, and B channel weights to 0, and the A channel weight to 1. if your texture has a lot of information in the green channel only, set the green channel to 1.
- Normal Radius - Because a normal map is used to fake depth information along the texture, it must have a width. Adjust this to suit your needs.
- Normal Intensity - This determines the strength of the normal map it will create.
Select the Input button: "None [...]" to import your badge image in:
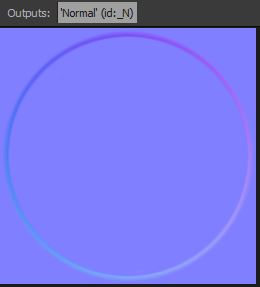
From here, you'll likely notice that the normal map in the top left has changed slightly:
By default, it will create the normal map from the alpha channel of the image you feed it, but this is only useful if your badge is completely 'flat' and you only want some rounded edges on it.
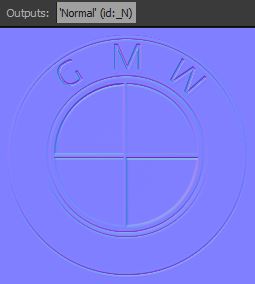
This is because the normal map is sampling the Alpha channel only. If you want your badge to have more bumpiness to it, change the Channel Weights to be more like this, to use the RGB colours of the texture to generate the normal map:
By messing with some of the Range and Intensity options as well, the normal map will look a bit more like this:
Either versions are fine, it depends on what you want your badge to look like as to which option you chose to go with.
Feel free to mess around with the settings to get something you're happy with.
Once you're happy with your normal map, hit 'Export as Bitmap' in the menu at the top left and save out your normal map.
We can now move on to importing the files to UE4.
Importing to UE4
This step assumes that the correct version of Unreal Engine is installed and configured correctly. See Modding for more information on the correct version of Unreal Engine to use and how to view mod content folders. Also see the official Unreal Engine documentation on importing .FBX files.
Creating your Fixture Mod Plugin
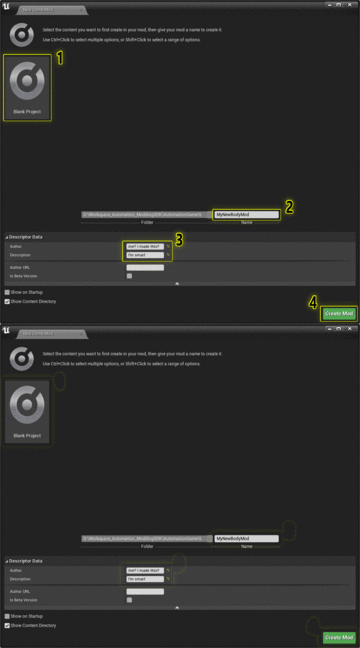
Using the correct version of Unreal Engine, with our modding tool project opened and plugins loaded, select 'Create Mod' from the top menu bar.
Import Your Textures
Click the 'Import' button in the top of the Content Browser, and import your Badge texture and Normal Map texture to your new Mod folder.
Copy the Badge Mesh
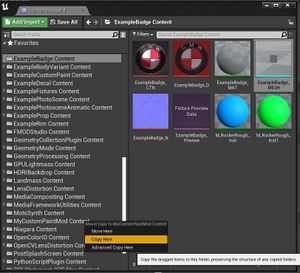
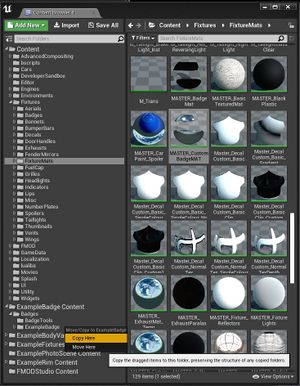
Select the ExampleBadge_MESH file from the ExampleBadge Content, and drag-and-drop it to your mod folder and select 'copy' from the dialog box that appears:
Copy the Badge Material
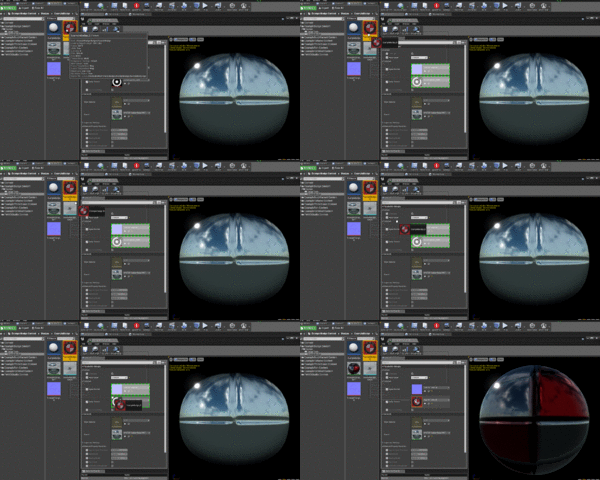
Open the Material Instance from the ExampleBadge folder by double-clicking it:
Find the Master Material in the Content Browser by clicking the magnifying glass icon in the Material Instance:
The Content Browser has navigated to the Master Material:
Drag-and-Drop the master material to your mod folder and select 'copy' in the pop-up menu:
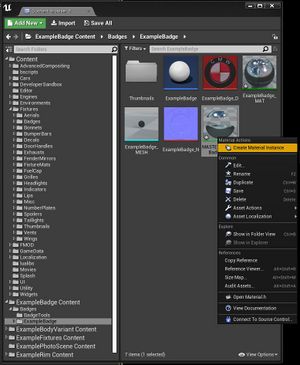
right-click that new master material in your mod folder and select 'create material instance':
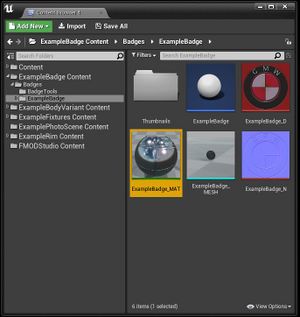
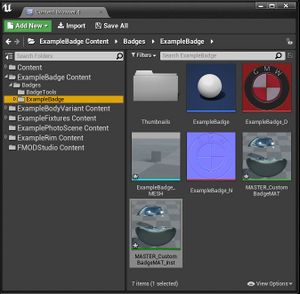
You should now have a mod folder full of two textures, a mesh, a material, and a material instance:
We'll set up everything now.
NOTE: currently, the SDK is missing a texture that is used by this master material, which causes the material to fail to compile, and your mod will not work!
to fix this: open the master material that you copied to you mod folder, and put your textures directly into the texture samplers that show errors, making sure to put the normal map texture into the normal map sampler, and the regular texture into the regular texture sampler. that will fix the material breaking. in the material menu, click compile, then save, then close the material. continue as normal.
Putting the Textures in to the Material Instance
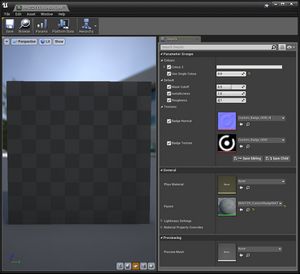
Open the Material Instance by double-clicking on it
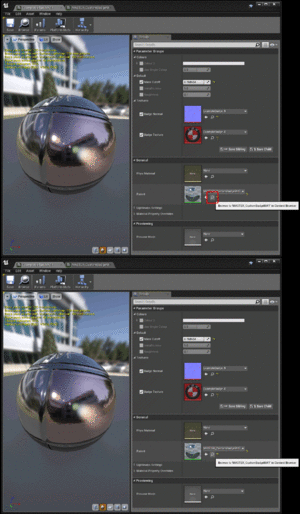
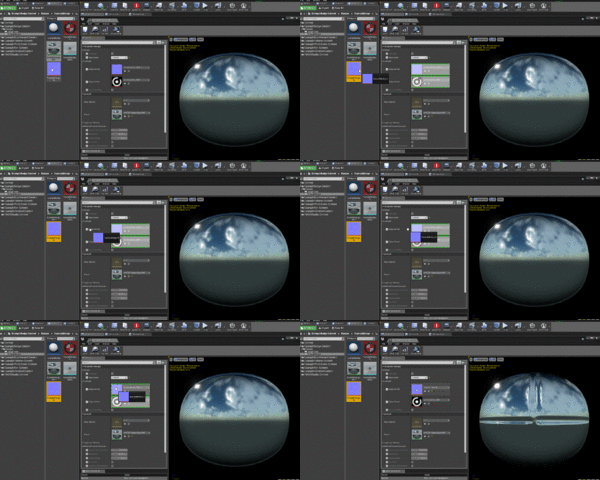
By default, the material will have the example textures in it.
To change this, select your textures one by one and drag them in to the corresponding slots in the material instance:
Once you have assigned your textures, you can change some of the settings in the material instance:
From the top, these settings are:
- Colour 2 - If you just want a single colour for your badge, set that colour here
- Use Single Colour - set this to '0' if you have a texture for your badge, or '1' if you want to use the single colour setting above
- Mask Cutoff - a 0-1 range at which the alpha mask is used to mask out your badge. Adjust this if you want to slightly change where the edge of your badge is.
- metallicness - from 0-1 how metalic you want your badge to be
- Roughness - 0-1 for how rough you want reflections and specular lighting to be on your badge.
Putting the material instance in to the mesh
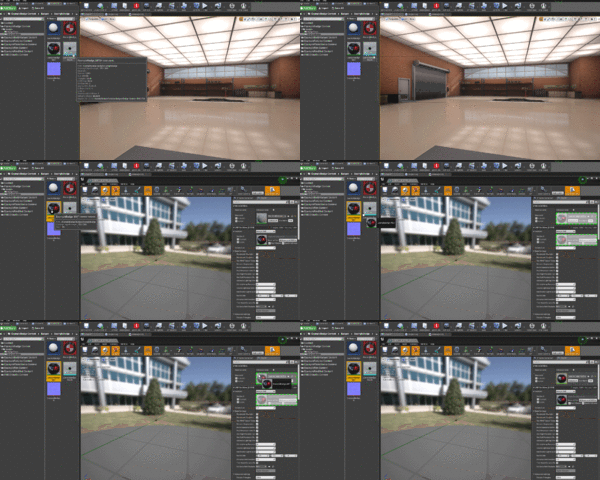
Open the mesh by double-clicking on it, and drag-and-drop the material in to the material slot in the Static Mesh editor
Put the Mesh in to the Preview File
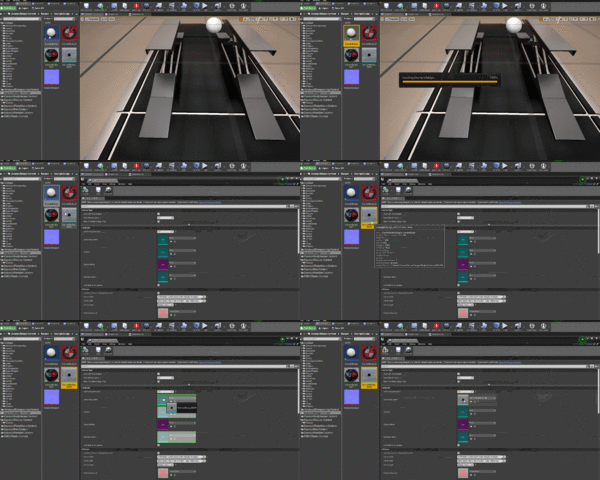
Open the Preview by double-clicking on it, and drag-and-drop the mesh in to the Conforming Mesh slot on the Fixture Blueprint settings. You can read more about the Fixture Blueprint here.
Generate the Blueprint GUIDs
In the Fixture Blueprint, generate the Fixture and Family GUID
Make sure to Compile the blueprint, then save all your files.
Generate the Fixture Thumbnails
Follow the Fixture Mods page on generating thumbnail icons to generate the thumbnail for your Badge.
Your badge should now be ready to use!
