mNo edit summary |
mNo edit summary |
||
| Line 30: | Line 30: | ||
[[File:Creating A Designer Level.png|frameless]] | [[File:Creating A Designer Level.png|frameless]] | ||
Open the Designer Level file. It has a few parameters: | Rename and Open the Designer Level file. It has a few parameters: | ||
*'''Name''' - This is text displayed on the preview of of the environment that shows in game. | *'''Name''' - This is text displayed on the preview of of the environment that shows in game. | ||
| Line 38: | Line 38: | ||
*'''Levels''' - An array of UE4 Levels, usually comprising of 1 [[Photoscenes|Photoscene Mod Level]] and 1 level with several blueprints within in it. | *'''Levels''' - An array of UE4 Levels, usually comprising of 1 [[Photoscenes|Photoscene Mod Level]] and 1 level with several blueprints within in it. | ||
*'''Preview Images''' - Images shown as thumbnails when the player is selecting a level. They should show off what the player should expect to see from the environment around the car and engines. | *'''Preview Images''' - Images shown as thumbnails when the player is selecting a level. They should show off what the player should expect to see from the environment around the car and engines. | ||
*GUID - The unique identifier of this level. This must be regenerated | *'''GUID''' - The unique identifier of this level. This must be regenerated for every new designer level. | ||
*'''Family GUID''' - Not used. Click generate for a unique Family GUID anyway. | *'''Family GUID''' - Not used. Click generate for a unique Family GUID anyway. | ||
===Create An Aesthetic Level=== | ===Create An Aesthetic Level=== | ||
If you already have a [[Photoscenes|Photoscene Mod Level]] | If you already have a [[Photoscenes|Photoscene Mod Level]] you want to use in the car/engine designers you can skip this step. | ||
Right-click the content browser again, and create a new <code>Level.</code> This is the actual designed level. | Right-click the content browser again, and create a new <code>Level.</code> This is the actual designed level. | ||
| Line 48: | Line 48: | ||
[[File:Make Level.jpg|frameless]] | [[File:Make Level.jpg|frameless]] | ||
Rename the level to the name of your mod, and end it with something like _aesthetic to help you differentiate it from the locator level. | |||
Double click the level to open and edit it. Follow tutorials to learn how to use the level editor, such as the [https://docs.unrealengine.com/4.27/en-US/BuildingWorlds/LevelEditor/ Unreal Documentation]. | |||
Revision as of 20:04, 7 March 2023
From update 4.3 onwards, Automation supports the creation mod levels that change the environment around the car or engine being designed by a player.
Overview
A Designer Level is a collection of Unreal Levels with a name, description, preview thumbnails and a year.
Players have the option to select a different Designer Level to show when they enter the car & engine designer, or the engine designer.
Usually, Designer Levels combine Photoscene Mod Levels with an additional level containing locators to position the cars and engines that are spawned by the car & engine designers.
Workflow
- In UE4:
- Set up a mod.
- Create and fill out a
Designer Levelfile. - Create your aesthetic level (or reuse a Photoscene Mod Level).
- Create your car and engine locator level
- Assign variables in Designer Level to your newly created levels
- In the Automation Workshop Publishing Tool:
- Set up a workshop item.
- Share your mod.
Create your Designer Level Mod
Create A New Mod
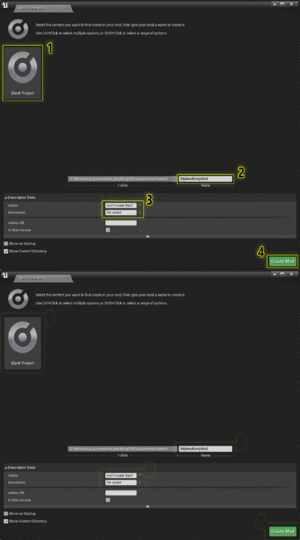
After setting up the modding SDK from Here, create a new blank mod:
Create A Custom Designer Level
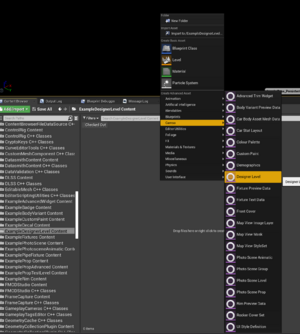
In your mod content folder, right-click and add a new Designer Level file. This is the file the game uses to load the levels.
Rename and Open the Designer Level file. It has a few parameters:
- Name - This is text displayed on the preview of of the environment that shows in game.
- Year - This is the actual paint itself. The material instance defines how the paint looks, what parameters are available, and how it looks when exported.
- Designer Types - An array containing the possible uses of this designer level. It should either contain Car & Engine Designer and/or Engine Designer
- Description - Additional text shown when mousing over a preview of a designer level in game.
- Levels - An array of UE4 Levels, usually comprising of 1 Photoscene Mod Level and 1 level with several blueprints within in it.
- Preview Images - Images shown as thumbnails when the player is selecting a level. They should show off what the player should expect to see from the environment around the car and engines.
- GUID - The unique identifier of this level. This must be regenerated for every new designer level.
- Family GUID - Not used. Click generate for a unique Family GUID anyway.
Create An Aesthetic Level
If you already have a Photoscene Mod Level you want to use in the car/engine designers you can skip this step.
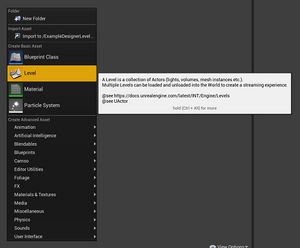
Right-click the content browser again, and create a new Level. This is the actual designed level.
Rename the level to the name of your mod, and end it with something like _aesthetic to help you differentiate it from the locator level.
Double click the level to open and edit it. Follow tutorials to learn how to use the level editor, such as the Unreal Documentation.


