Beginning with LCv4.2, Automation supports player-addable and player-customizable props to be placed and edited in the photoscene.
A Prop can be placed by the player into the photoscene, and moved/scaled/rotated freely, and optionally may have its' own set of player-customizable UI options.
A Prop can be anything, from a traffic cone, to a mannequin, to a post-process effect that changes the way the camera sees the scene.
Overview
A prop consists of a collection of files:
- A Prop blueprint
- A Prop Preview file
- A Prop Group file
- A Prop Preview thumbnail
- A Prop Group thumbnail
- (Optionally) A Prop Widget blueprint
The Prop Blueprint is the actor which will be placed in the photoscene, and can be moved around and edited by the player.
The Prop Blueprint is spawned into the scene when the player selects a Prop Preview file.
The Prop Preview file contains a link to the Prop Blueprint, which it will spawn when the player selects it. The Prop Preview file also contains a link to a thumbnail image to display in the UI, as well as a link to the Prop Group under which this prop should be displayed.
The Prop Preview file may also optionally contain a reference to a prop widget blueprint, which will be added to the photoscene UI under the Selected Prop Settings menu.
The Prop Group also contains a thumbnail, which will be displayed when the player enters the prop group selection menu. when the player selects a Prop Group, all Prop Preview files that reference that group will be displayed to the player.
Workflow
- Create your prop, with all its optional functionality, inside a Blueprint whose parent class is
Photoscene Prop Parent Class. - (Optionally) Create a prop widget, with all its optional functionality, whose parent class is
Photoscene Prop Parent Widget. - Create a thumbnail texture for your prop.
- Create a
PhotoScenePropPreviewfile, and fill it out with your prop blueprint, thumbnail, and optional widget. - Fill out the remaining settings inside the prop preview file, including a Prop Group (if this prop is part of an existing group).
- If this prop is not part of an existing prop group, also create a prop group preview file, prop group thumbnail, and assign the newly created prop group to your prop preview file.
Creating a Prop Blueprint
A Prop Blueprint contains all of the visuals and functionality of your prop. It can be as simple or as complex as you like.
The Prop Blueprint is a child of Photoscene_Prop_Parent_Class.
To Create your Prop Blueprint:
- right-click in the Content Browser, and create a
Blueprint. - From the window that pops up, drop down the 'all classes' menu, search for, and select,
Photoscene_Prop_Parent_Classas the parent class.
A prop blueprint can contain whatever you like, whether it be just a simple static mesh, or something more complex like an animated object, or something with physics simulation.
Prop Blueprint Functionality
There are a few helper functions in the Prop Blueprint that you can override and use:
- Init:
- This function is called when the prop is first spawned in the scene.
- If you want to initialize or set up anything when the prop is created, do so here.
- On Spawned:
- This function calls Init.
- This function is for internal use only.
- Do not call this function yourself.
- Post-Screenshot:
- This event is called just after a photo is taken in the photoscene.
- If you have anything set to turn on or off during a photo, this event happens right after the photo is taken.
- Pre-Destruct:
- This event is called just before the prop is deleted.
- If your prop affects things outside of the prop actor, such as putting a post process effect onto the camera, or changing some part of the scene, please use this event to disable/undo all those effects before the prop is destroyed.
- Pre-Screenshot:
- This event is called just before a photo is taken in the photoscene.
- If you have any effect that you do not wish to be included in photos, use this event to turn them off, or vice versa.
- Snap To Ground:
- This is an internal function and should not be overridden.
- Trace For Ground:
- This is an internal function and should not be overridden.
Creating a Prop Widget Blueprint
Like photoscenes, props support custom UI functionality.
You can set up buttons, sliders, drop-down menus, and whatever else your heart desires, to do whatever you want to your prop, or to the world around it.
Prop widgets are derived from the parent class Photoscene_Prop_Parent_Widget.
Simple Prop Setup
The System for creating Photoscene Props has been updated for:
- Static Meshes,
- Skeletal Meshes,
- ParticleFX,
- Post-Process materials,
- Decals.
The purpose for this change is to streamline prop creation for simple props that don’t need unique functionality, i.e: basic objects. We’ve done this by adding more optional information in the PhotoScenePropPreview class (and a child of the prop parent class that can read that information) in order to determine prop behaviour and accessible variables.
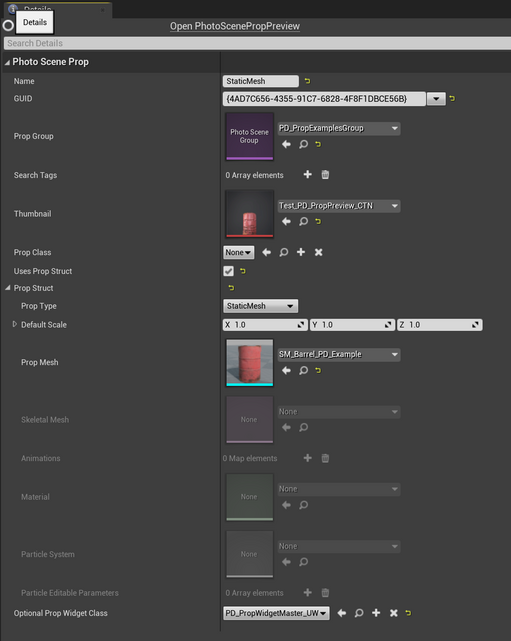
Inside the Photoscene Prop Preview file, there is a new Prop Struct. The Prop Struct is where you add the data you need for the prop to build itself in-game.
Using the Prop Struct
- Fill out the details as usual, with the exception of the Prop Class.
- Leave the Prop Class blank (i.e: a value of ‘None’).
- Unless you know what you’re doing, overriding this will cause the Prop Struct to not function properly.
- Then tick the ‘Uses Prop Struct’ checkbox.
- Select your prop’s type from the prop type drop down, this will enable you to edit the necessary variables below. Different prop types have different applicable variables. We disable the irrelevant variables for you, to avoid confusion.
- Fill in the relevant asset references with your prop’s assets. Most of these are self-explanatory.
- Set the Optional Prop Widget Class to ‘PD_PropWidgetMaster_UW’. This will create a widget at runtime that allows the player to edit your prop’s parameters.
How To Create Parameters For The PD_PropWidgetMaster_UW
The PD_PropWidgetMaster_UW currently supports the following parameters: Material Vector/Scalar parameters, and Particle System parameters.
Using Material Parameters
To expose Material Parameters to the widget for the player, there is some preparation you must do in the Material itself:
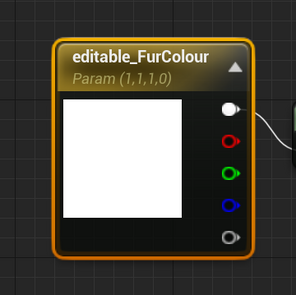
Ensure that the parameters you wish to expose include “editable_” in their names.
Create a Material Instance from the Material.
Apply it to the mesh, if you are using one.
If making a Decal or Post Process, then put this Material Instance in the Prop Struct Material slot.
Open the Material Instance and ensure the parameters have the check box ticked next to their names.
Material Vector Parameters will show up in-game as a colour picker with 0-1 range.
Material Scalar Parameters will show up in-game as a slider with 0-1 range.
If you want your scalar parameters to apply values within a different range, add a lerp node after your editable_ScalarParameter, with the parameter set as the Alpha input of the lerp. You can then specify its’ new minimum and maximum values by changing the respective A and B input of the lerp.
Using Particle Parameters
Exposing Particle Parameters to the widget does require some knowledge of how to edit particle emitters in-engine. The workflow is the same on the Prop Preview side, but differs slightly between Niagara, and Cascade, particle systems.
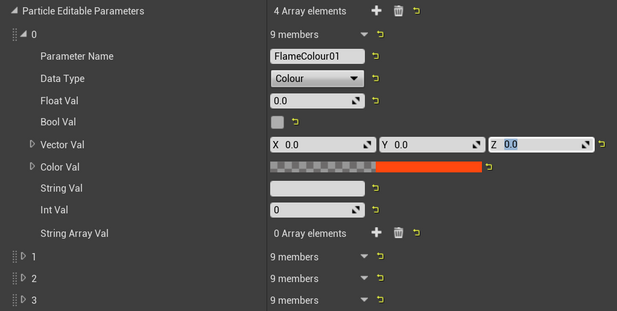
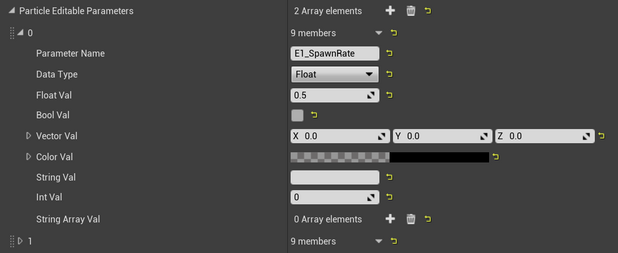
In the Prop Preview, below the Particle System variable, there is an array of Parameters you can add.
Ensure that the name and data type match the parameter you want to link to in the emitter itself.
Currently, the following parameter types are supported: float. Bool, vector, and colour.
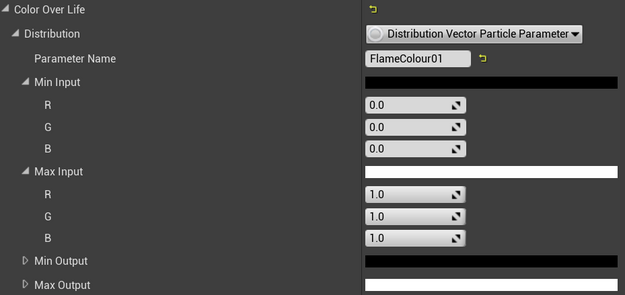
In Cascade, when setting a parameter to be exposed for editing at runtime, ensure the Parameter Name within the Emitter Module matches the name in the Prop preview.
Min input should be 0 and max input should be 1. The output values can be whatever you like.
In Niagara, you will need to add User Parameters that match the Name and DataType of the corresponding parameters in the Prop Preview, and plug them into the emitter modules as necessary.
In Niagara, exposed variable names have the “User.” prefix, adding this to the Parameter Name within the Prop Preview is not necessary as its inclusion is handled for you.
We recommend keeping user parameters between 0-1, and then using them as an Alpha to lerp between preset min/max values.

