Modding is now also possible with Blender. You will need to take into account that some things work slightly differently in Blender than in 3ds Max. Some things might just have different names in the user interface but work essentially the same way. Here are some tips to help you get started with modding in Blender. This is not meant as a tutorial on how to use Blender, there are plenty of those available all over the internet. These instructions only mention the things that are different between 3ds Max and Blender, and some basic advice.
Setting things up
If you intend to make a lot of Automation mods, you might want to set up a new default startup scene tailored for modding. Delete the starting cube. I also delete the default point light from the scene.
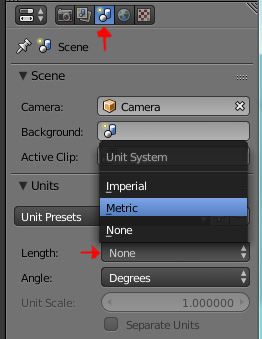
In the scene settings, set the units to metric:
Hovering your mouse over the 3d view, press N to bring up the Properties toolbar. You will need it. It will show you dimensions of things and let you precisely move things by inputting numbers.
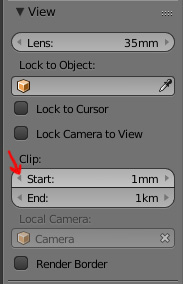
In the properties toolbar you will find a section called View. You should change the Clip Start distance from the default 10cm to something smaller. One click on the left arrow there will lower it to 1mm which I find a good value. This is so you can take a really close look at things in the 3d view without the camera clipping things out.
Fixtures
Fixture making works mostly the same as in 3ds Max. Just make sure you have the dimensions and orientation right. Y axis always points towards where the surface of the car would be. If your fixture is something that usually points forward, like a headlight, the Y axis should point backwards, towards the rear of the car. If your fixture is something that would usually be put on top of the car, for example an aerial, you will have to turn the fixture so that the Y axis points where "down" would be in the car.
Materials
The default name for a material in Blender is simply "Material". Double click on the material name to rename it. It's a good idea to name the materials to the correct fixture material slot names already in Blender, although you can rename them in the Unreal Editor later if you forget.
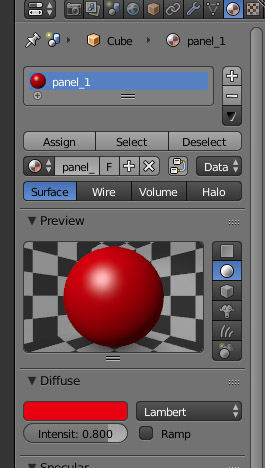
Here I have named a material to "panel_1", which will make it appear the same as the car body paint selected in the game. I have also changed the diffuse color to red. Changing the colors of your materials helps to make it more clear which faces have which material applied to them. The color will not show up in the Unreal Editor or in the game, because you are not supposed to import the materials when importing the mesh. Only the material slot name will carry into the Unreal Editor.
Smoothing groups
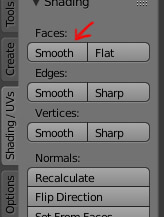
Blender doesn't have the same kind of smoothing group system. You should just select the faces or edges you want and click Smooth or Sharp in the Shading/UVs tab.
UV unwrapping
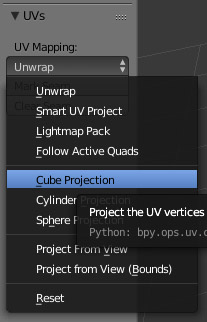
Generally just selecting all faces and choosing Unwrap -> Cube Projection will be all you need to do for unwrapping, unless you plan on using a custom texture that needs to be at a specific scale/orientation/place, in which case you might want to try Smart UV Project. You might also need to scale the resulting uv islands up some (in the UV/Image editor, press A to select all faces and S to scale.)
Rims
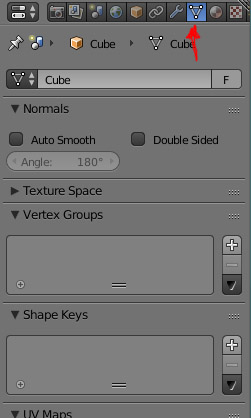
The Morph Targets mentioned in the Rims modding tutorial are more or less the same thing as Shape Keys in Blender. You can find them in the Object data tab:
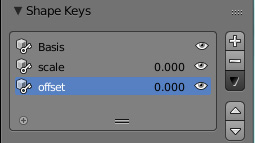
You can add or remove shape keys only when you're in Object mode. Add three keys, Basis, scale and offset:
When you are in Edit mode, all your edits will affect the Shape Key currently selected. Consult the Rims tutorial on the dimensions you should edit the mesh into for the scale and offset morph targets/shape keys.
Other than the Morph Targets, rims are done in the same way as in 3ds Max.
Bodies
Probably the only real problem you'll run into when making bodies is that they need a very specific way of uv unwrapping that can't be easily done by hand. There is a script for 3ds Max to do it automatically but no such script exists currently for Blender. You could for example give the body to someone else to unwrap when it's otherwise finished.
Ok this is rushed because I have other things that need doing first, but yeah just do w/e you need to to skin/model your body any which way you like, making sure to stick to the workflow as described in the Car Body Mods page, and when it comes to unwrapping it, just make sure the entire car is one solid mesh with no gaps between polys, then just hit the 'unwrap' button and it should do a pelt unwrap. make sure the result is perfectly mirrored along the Y axis by setting it to 'conformal' or 'angle based', i forget which it is but it should be obvious after trying it out. Download TexTools, and it has a button for alligning a UV Island along a cardinal axis based on a selected edge. select a center edge to do this. then move the island so that this center edge is perfectly in the center of the Y axis of the UV 0-1 range. the result should look something like this:
if your body is not one whole complete gapless mesh, this will be what you get and this is wrong:
to find out if your mesh has no gaps like that, use CTRL-ALT-Shift-M in edge mode. the only edges that should be selected should be the ones around the outside of the car. if any are selected inside the car, you need to fix them first before unwrapping.
Modelling a Body in Blender in 9-hours
I've made a couple video streams, complete with timestamps, about modeling bodies in blender 2.8. - HardRooster
{{#ev:youtube|bHd69WWBvXg}} {{#ev:youtube|pbDB0es1RY4}}
Exporting
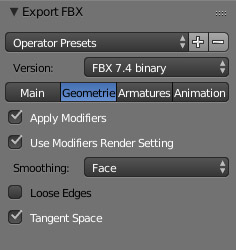
These export settings seem to work well. Otherwise defaults but on the geometries tab tick "tangent space" and change smoothing to "face". Make sure your mesh only has quads and/or triangles, no polygons of more than 4 vertices.
when exporting a skinned mesh, in the 'Armatures' tab, un-tick 'add leaf bones'. that just cleans it up a bit. its not necessary, but... yeah.
General useful tips
- Double tap G to slide a selected edge along a face or a selected vertice along an edge.Useful for tweaking your edge flow.
- ctrl + T to triangulate selected faces. Normally you don't need to, as the mesh gets triangulated automatically on import to UE, but sometimes, especially with rims, you might get results that have ugly shading. Triangulating the mesh yourself in Blender just prior to exporting gives you the option to choose the method of triangulation. The default is "Beauty", but rims for example will usually look better with "Fixed". The "Beauty" method will often make the triangles go in a criss cross pattern which will make the shading in Unreal Engine look wavy.
